Sunday, March 29, 2015

Cross Stitching

I'm taking a break from quilting for a little bit.  Still not feeling good and I can pick up and put down the cross stitch project a lot easier than the quilting projects.  I've been telling you about the great cross stitch stuff that was sent to me by Marilynn.  I have started one of presents.  It is an angel that when stitched up goes underneath a glass or acrylic square to act as a hot pad or something.  The stitched design will go on a 5" square when done and this had the whole kit so I figured why not.

Want to see what it should look like?


Of course I have a lot of stitches to do before it gets to be that pretty but I've started.


For fun I thought I'd also describe how I do itl  As you can imagine, the pattern was very small.  Thanks to a handy copy machine it's blown up to a decent size and colored pencils/markers work wel to color in the stitches that I have done already.  If I'm off a line (which I might be on this)  but I think I can correct it or add in the line without it detracting from the pattern.

Well back to sitting down and napping.  Everybody have a great day.


Saturday, March 28, 2015

1st Log Cabin Block

I finally did it.  I made my first log cabin block.  That is the 3rd  beginner block in the Creative Rectangle Facebook Group.  I thought I'd start with the beginners and was glad that I did because I sewed the log cabin block wrong three times today!

Here is the finished block:


I'm not too fond of that lighter blue.  It's darker in real life but it does show up too light I think.  I will keep it though since this is a sampler that I'm doing.  If it bugs me too much I might paint on some tea water to darken it a bit.  I was happy to be able to use up some of my African fabrics in it also.  The two yellows (the yellow and blue stars and the yellow and blue flowers) are from Africa as well as the gold/black/blue geometric material.

It's a learning experience and since it is a single block I might not change it.  The other two blocks that I have done can be seen in this picture.


I'm headed back to bed now.  I'm not feeling well so am resting a lot this weekend.  It's either the crud that is going around or allergies.  Actually it could be both but we'll see.  The allergy pills are letting me breath right now and my skin isn't itching any more so that's a good thing.  Next time I"ll take a picture of some of the cross stitch that I'm working on.  My friend sent me some more patterns and there is at least one that I want to make.  I'll tell you more about that later.

I hope everybody else is well and having a great weekend.

Until next time Happy Stitching.

Tuesday, March 24, 2015

YIIIIPPPIIIIEEEEE!

Have I mentioned I love working for my boss?  Probably not last week and this week since he came back from Ghana I've been VERY busy.  But I met all my deadlines and things have started to calm down a little.  At least as calm as they get in my office.  But today is different.  Today I'm back to loving him because......drum roll.......

He brought back some fabric from Ghana.  It's going up in price over there every year and he has so many people asking him to bring stuff back that this year I didn't ask for fabric.  BUT I GOT IT ANYWAY!    YIIIPPPPEEEEE!

So here is my newest additions to the Ghana fabric.


They all are Wax Block Prints.  I will happily put them in my collection.  :)

Ok, now I guess I'd better get back to work.  LOL.

Have a great day!


Monday, March 23, 2015

Fitted Sewing Cases

In my box of goodies that I received the other day, was a magazine called  Sampler and Antique Needlework Quarterly.  I had so much fun looking through it especially when I ran across two articles.  One showed an Italian Black Iron thimble.  Obviously it wasn't very popular for long because iron is very heavy to be putting on the fingers.


Another article that I liked was one showing pictures of fitted sewing cases.  I think it would have been great to have had one of these.  There is just something about opening up your sewing case and everything you needed was right there.  

The article said this first one was probably English and around the middle of the nineteenth century.  5 15/16" wide x 4 1/2" high.  


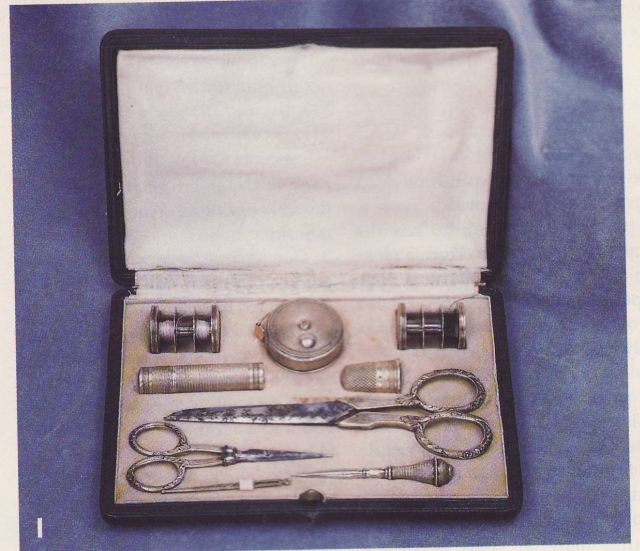
The second picture is a beige leather case around 1898 from Providence Rhode Island and is 5 7/8" wide x 4 5/8" high.  I like the floral motifs on the scissors, etc.  The picture marked 3 is French and the tools are silver.  It's from the early nineteenth century 5 13/16" wide x 4" high.  You can, of course, read these comments on the pictures number 1-4 but I'm just typing them also so you don't have to strain your eyes as much.  :)  The one marked four is very nice.  I love the pull out drawer.  Don't let the picture fool you.  Even with the pull out drawer it is only 5 15/16" wide x 4" high.  It is English and has silver tools in the red leather case.  The article puts it around 1820.  


Number 5 is French and has silver and steel tools in red leather.  From the Nineteenth century it is 4 7/8" wide x 2 3/4" high.  Number 6 is a little difficult to see since the picture was split and put on two pages.  It is a French red leather case with silver tools from early nineteenth century.  It is 4 7/8" wide x 2 7/8" high.  Even though you can't see it, the case is embossed with lute, bird and diamond motifs.


Number 7 is a blue leather case from England probably between 1841-1910.  It is  8/1/4" wide x 3" high.  The scissor blades are marked "SHEFFIELD" and the blade and shank are marked "Steel" with a Birmingham hallmark.  The thimble is from Dorcas.  

Number 8 is Austrian Silver and enamel tools in a blue leather case.  Early twentieth century this time with it being 5" x 6 1/4" high.  The knife in it would have been used for pressing.  The silver is matte finished and the design is art deco which was so popular at the time.

Number 9 is French and a little different.  It is a tapered  brown leather sewing case from around the middle of the nineteenth century.  it goes from 1" - 4" wide x 5 3/4" high.  The pins in it are pearl headed.  I like how it opens up and can just imagine a lady sitting down and slowly opening up her case to it is all handy.


The sewing cases came in all shapes and number 10 shows a French one that is oval shaped.  It has silver gilt tools in a light red case and measures around 5 1/8" wide x 3 1/2" high.  It is from 1880 and shows the case being marked "Dreiger & Co, 5th Avenue, New York".  Next to it  (No. 11) is a tapered French sewing case.  It has silver gilted tools in red leather.  This French sewing case measures 3 1/2" wide x 6 1/4" high and was used in the early nineteenth century.  It has a cornucopia motif to it and it was imported from "Dreiger B C in New York".  


Picture 12 has a little different design.  It is French and has silver gilt tools in a tan leather case.  It was used around 1900 and is 2 7/8" - 3 1/2" wide x 5 3/4" high.  When closed it is suppose to be shaped like the neck and upper chest of a woman.  I'll take their word on that part.  LOL.  Number 13 is fun since it is a fan figured sewing case.  The article suggests it could be from England.  It has steel and bone tools in red panne' velvet case.  It is estimated to come from the late nineteenth or early twentieth century and measure 2 1/4" wide x 11 1/2" long.  Notice that the vertical sewing cases all had strips to hold the pieces in place.  Sometimes it was made out of ribbon and sometimes leather.   The article also hinted that this could have been used by a lady of the evening.  She could be sewing until needed and then simply fold it up and she had her fan again.  I discount it because I didn't think ladies of the evening would have the opportunity to do needlework when they were on the job but also the fan is only the motif and not functional as a fan.  It it still fun to see and perhaps they did use it, who knows.  As they say, that was "before my time".

The last one pictured and talked about in the article is number 14.  The iron figure sewing case.  The source of it was unknown but there was steel and bone tools in steel blue leather case with silver fittings.  Estimated to be early twentieth century it measures 4 3/4" wide x 6" long.  The tools in it are not matching but are from the same era and notice that they put crochet hooks in their sewing cases as well.  I wonder if they could heat up the iron figure sewing case and it served also as a pressing tool


]I hope you enjoyed seeing the different sewing cases.  Do you think your sewing case will last for over a century?  I know mine won't.  LOL.

I will be doing some cross stitch today at lunch instead of quilting.  It is a pattern of an angel and relatively small so it can be made into a hot pad.  

No matter what you decide to work on, or NOT decide to work on, I hope you have a great day.  Until next time......

Happy Stitching.

Saturday, March 21, 2015

Today I remembered that I am blessed

Oh I know I'm blessed.  Grew up knowing it and realize it every day.  There are some days which make it harder to remember it because unknowingly I let the negativity of work or whatever push it aside.  Not today.  Today is a great day for when I picked up my mail this morning I had not one but TWO surprises in it.  A great friend sent me a gift card to cheer me up a bit.  It was a nice surprise since it will be very useful when I go grocery shopping this week.  The other thing that blew me away was a medium sized flat rate box packed full of cross stitch stuff.  (Corrected entry)  My new friend didn't have to "get rid of stuff" but instead just wanted to share what she had had been blessed with.   That is such a wonderful thought and idea.  I contacted her and she said she'd send me some things.  I didn't expect such generosity.


I am going to have so much fun going through everything.  There are even some things I haven't tried to do before so perhaps this is a sign that I should try those techniques.  :)

Thank you my friends.

I hope everybody else is having as good a day as I am today.


Thursday, March 19, 2015

What's on the wall...and what it represents

I put up one of the quilts that I got from mom on my work wall this week and the more I stare at it (oh shush, I'm working too) I come to realize why I like it.  Yes it has bright colors and it's a design that I haven't done yet but it is also a learning quilt to me.


It has to wrap around the little alcove corner but it still fits pretty well.  This quilt was made by elderly ladies from the nursing home my mom was in.  They had a group of ladies who would do quilting.  Sometimes they would just do a block, sometimes they would do small wall hangings and sometimes the less disabled ones would do something like the above.

I took my ruler today to figure out what size those rectangles and squares were so perhaps one day I might duplicate it and that is when I made my discovery.  Looking at the quilt from a distance, I didn't notice that the rectangle and squares are not all the same size.  The rectangles finished at 2 1/2" x 5 1/4".  A different size to be sure.  Then I measured one of the squares and it finished at 2 1/2".  Not bad I thought.  I moved my ruler to another section of the quilt which I thought I'd get a better picture at.


And that was when I noticed that my 2 1/2" squares are not all 2 1/2" squares.  One time there was a 1 3/4" square.  Sometimes there was a 2" square.  Yet somehow it all fit together.  That is the lesson that I wanted to share.

We aren't perfect.  We stress over way too much in these days and times and we don't NEED to be perfect to get joy out of a quilt.  The squares aren't all the same and yet when you stand back and look at the quilt you don't immediately see it.  Quit stressing about something that is suppose to give you pleasure.  If you like it...you like it.  

Sunday, March 8, 2015

Weekend sewing

I wasn't very productive over the weekend but I did manage to get two blocks done.  Yes, that's right.  Only two.  Those two blocks were easy ones to do too.  LOL.

I'm in a facebook group called "Creative Rectangle Quilting".  It a group that is slanting things towards Rectangle.  We'll do other blocks and stuff but we started a couple of BOMs.  One is more for beginners and the other for more Intermediates.  This weekend I did two of the beginner blocks.

This first one is called Basket Weave.  These are 12 1/2" blocks.  The strips in this one is 1.5".


The second beginner block is called Woven.  The yellow star  fabric in this second block is some of the fabric that came from Ghana.  The amount I had is more along a fat 1/8th.


In between doing the two blocks I also tried a new recipe.  It's broccoli rice cups.


I think I should have cooked them a little longer because they didn't keep their shape well after taking them out of the cup cake tin.  They did taste good so I'll try again and cook longer next time.  If it still doesn't work out to well I'll go and just make the recipe in an oven proof pan.

Everybody have a good day.  I'm back to searching patterns with rectangles in it.  Around the Holidays we'll be doing some mug rugs.  :)  Perhaps I should search some applique patterns since there some people who want to try that.

Before being in this group I never realized how many patterns have rectangles in them.  That's a good thing.  :)

Sunday, March 1, 2015

Free Mug Rug pattern from The Quilt Pattern Magazine

Why is The Quilt Pattern Magazine giving away a free mug rug pattern?  The obvious reason is because they are a great Magazine.  They are also doing it because March 21st is National Quilting Day.  You don't have to buy a subscription to the magazine, although I think it is one of the best buys around.  Requesting the pattern will also put on their newsletter list (which is also free).  They will then email you the pattern.  Just check it out and make up your own mind about it.

http://www.quiltpatternmagazine.com/program/CD-ILQMR/


T-Block from Missouri Star Quilt Company

Have you seen the video from the Missouri Star Quilt Company yet?  I liked it enough that I made a small wall hanging from it.  Here is the link for you to watch if you haven't seen it yet.

https://www.youtube.com/watch?v=zSVORYlQtBA&feature=em-uploademail

For those of you who like written instructions:

First of all the yardage (for the quilt from MSQC):  Approximately (42) 10" squares and (33)  2 1/2" strips (which would include the first border).

For my wall hanging I used nine 10" squares.

So you start off taking your 10" square and cut off a 4" section.


Repeat for all of the 10" blocks.  Make two stacks.  One for the 4" rectangles and one for the 6" rectangles.


I decided to use black fabric for my "T".  I took my black 2 1/2" strips of black fabric (from a jelly roll) and started to sew the 4" sections to it.  Instead of just cutting what I needed, I chained pieced my 4" sections to it.


After finishing sewing the 4" sections to the black strip, I cut them apart and ironed the material to the black side.  The next step would be to sew the 6" sections to the black strip.  Before you sew the 6" sections, you need to decide how you will match them up.  This took me a little bit of time and I will confess that I cheated a bit.  If I found I liked a combination, I kept the same combination for both the 6" and 4" section.  In the picture below, I would have the six inch purple batik paid up with the four inch blue pattern.  Then I put the six inch blue pattern with the four inch purple batik.  Once you have the pairings like you want, sew it to the black strip.


When finished, iron to the black and you should have the base of your t-block finished.


The next step is to sew the black (in my case) 2 1/2" strips to the top of the block in order to finish your T.  If you wish to have the blocks have an illusionary affect, make sure the 6" side is always on the left.  I started to chain this step also but it didn't work out very well.  I had to resew a couple of them because I sewed it to the wrong side.  Perhaps it is best to sew those one at a time.  In no time at all you'll be done with your blocks.  MSQC said to measure your base of your t-block so that you know how much to cut your 2 1/2" strip for the top of the T.  I knew it would be less than 12" so I just cut my strips 12" and then trimmed when I was all done.

The layout should be like the picture below.  All the blocks in the vertical row are placed in the same position.  The next vertical row the blocks are turned up side down, etc.  If you prefer to think of it in terms of horizontal rows, you are alternating where the top of the T is in each block.  The first block the top of the T is at the top of the block.  The next block the top of the T is at the bottom of the block, etc.  Just refer to the picture below.


Sew your blocks into rows and then join the rows.

You should be ready for the first border.  The border is 2 1/2" strips in the same color as the T.  Once again I used the black jelly roll.


That is where I stopped.  The next step according to MSQC would be to add a 5" border to it.  I think that 5" is too large for a wall hanging.  IF I put on another border it would be probably be around 3-4".  I'm not sure if I want to put a second border on.  I stopped here so I can think on it and audition various fabric for the border (if  I do it) or binding.

What do you think?  A second border or not?


Whew! Time for a break!

I have been busy these last few days.  I even got out my sewing machine and did some 9 patch blocks so I could continue on with Fleur.  Do y...